Showing posts with label Tutorial. Show all posts

Sunday, December 22, 2013

Santa Ornament

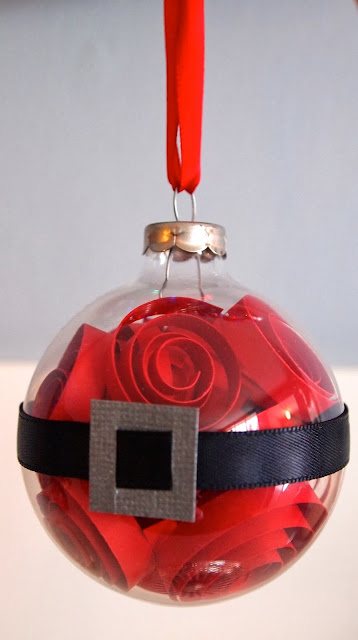
I took an ornament making class at Archiver's last month.  We made four ornaments.  Frankly, I wasn't too excited about the class but at least one of the ornaments we made was worth repeating.  For my annual holiday cookie exchange and ornament making party, we made the santa ornament I learned in that Archiver's class.

Craft Room Confidential - Santa Ornament

Not only are they super cute, they are super easy too.  You could probably whip this one up yet tonight {if you have the supplies of course}.

What you need:
  • Clear ornament
  • Red scrapbooking paper
  • Black ribbon
  • Silver scrapbooking paper
  • Red ribbon
  • Paper trimmer
  • pencil or dowel
  • double sided tape
  • scissor
What you do:
  1. Cut the red paper into 1/4" strips.  I used a mixture of 12" and 8" lengths.  The number you need depends on how big your ornament is and how full you want it to be.
  2. Roll a strip around your pencil or dowel and place your roll into the ornament.  Continue until the ornament is full.
  3. Measure the black ribbon around the ornament and cut to size.
  4. Cut the silver paper into a square.  Mine was a 3/4" square.  Cut two slits in the square.
  5. Thread the black ribbon through the slits you made in the silver square.
  6. Using the double sided tape, adhere the black ribbon with silver buckle to the ornament.
  7. Use the red ribbon to make a hanger. 

Craft Room Confidential - Santa Ornament

Ho, Ho, Ho Merry Christmas!
Craft Room Confindential - Santa Ornament

Saturday, July 27, 2013

Tag Blanket

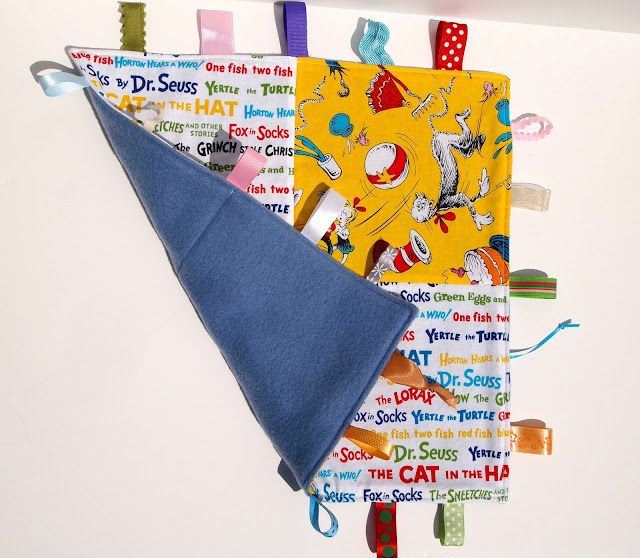
Time for the final installment of Baby Gift Month here at Craft Room Confidential.  And I must say, I saved the best for last.  {IMHO}


Craft Room Confidential

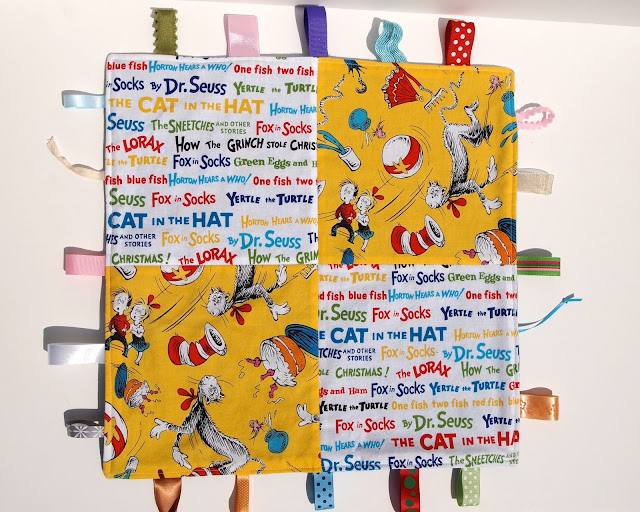
I have to admit, I was not at all familiar with the concept of tag blankets.  But with the help of Google, I think I am up to speed now.  And after my research I knew this was something I had to make for my friend and her new baby.  This Dr. Seuss fabric is perfect for this project and along with the colorful ribbons it just screams hold me and play with me!  What baby could resist this?  I chose to use polar fleece for the back side to give it a nice soft touch.  {I had several scraps to choose from in my stash but I liked the blue best.}

Craft Room Confidential

Did I mention how easy this was to make?  Here, let me tell you all about it:
  • Cut fabric into 4 squares measuring 8" x 8".
  • Sew two squares together and press seam open.  Then repeat with remaining two squares.
  • Sew those two pieces together, matching center seams, and press seam open.
  • Using your newly created larger square as a pattern, cut out your backing material.
  • Grab your ribbon stash and start selecting your ribbon.  I used 20 different ribbons cut to 4" - 5" lengths.  You can use more or less.  If possible, try to get a variety of textures and widths.
Craft Room Confidential
  • With your pieced square face up, pin your ribbons around the edge.  I just eyeballed it but feel free to measure if that's your thing.
Craft Room Confidential
  • Sew your ribbons onto the fabric square with a 1/4" seam allowance.  I suppose that this step could be optional but I chose to do it because I wanted to be sure the ribbons would be securely attached.
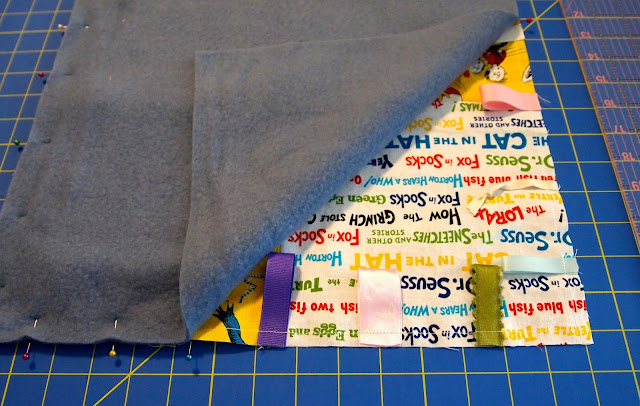
  • Place your backing material on top of your ribbon/pieced square, right sides together.  {Think ribbon sandwich.}  Pin.
Craft Room Confidential
  • Sew around entire square with a 1/2" seam allowance, leaving a 4" opening on one side.
  • Clip corners and turn right side out through the opening.  Press.
  • Topstitch around outside of square, making sure to sew the opening closed.
  • Stitch in the ditch of the pieced square.  This step is optional as well.
Craft Room Confidential
  • Give to a baby.
I just love how this came out.  I think the fun different colored ribbons is my favorite part.  Or maybe the awesome Dr. Seuss fabric is.  I just can't decide.

Craft Room Confidential

I sure hope the baby loves it.  {But really, how can she not.}

Craft Room Confidential

I hope you enjoyed Baby Gift Month.  Here are the other gifts featured in case you missed them:

I am sharing this project at my favorite parties.

Saturday, February 9, 2013

{Framed} Heart Art

Last month I came across this cute Valentine Wreath by Kaminski's Creations.  I really liked it but I wondered how I could make it interchangeable.  You know - so I can change it out for every season/holiday.  This is what I came up with:


I simply made some heart art, strung some monofiliment through it, hung it and then hung an open back frame over it.  So easy!

What you need to make one:
Open back frame {mine was 6 1/4 x 6 1/4" from Michaels}
Sawtooth hanger
One sheet of two-sided paper (could also be done with single sided paper, just use two then)
Nylon Monofilament
Scissors, Needle, Tape, and Tacky Glue

Start by attaching the sawtooth hanger to your frame.  


Cut out seven hearts.  The size will depend on your frame.  Mine were 3 inches.  One of the hearts with be the base.  Thread the monofilament throug the center top of the base heart.


Keeping in mind that this with be hung from the nail, measure how long the string should be and then make a knot and trim the excess.


With the remaining six hearts, score a line down the center of each heart and fold them.  Then, with tape, adhere one half of a heart to another heart.  Continue doing that with each heart, alternating the sides of the heart.  Lastly, glue the hearts to the base heart you prepared earlier.


I would recommend letting the heart dry for a little while.  Then you simply hang it up.


To complete the look, hang your frame that you prepared earlier on the same nail.  Ta Da!


I actually made two hearts with a Valentine's theme.  Depending on my mood, I can easily change them around.


And on the 15th, you can change it out for something different.  Maybe a St. Patrick's day heart?

I'm sharing at these parties.

Sunday, December 9, 2012

{Handmade Christmas} Pinecone Ornaments

I love making Christmas ornaments and am always looking for new ideas.  I found this one in the December-January 2012 issue of Country Woman.


I'd actually seen these elsewhere but without instructions.  I thought they looked complicated but they really aren't.  And once you get the paper cut, it goes pretty fast.  I just put a Hallmark Channel movie on and away I went.


Here's how I made them:

Materials:

  • Paper Trimmer
  • 12-inch square scrapbook paper
  • Bone folder or sturdy plastic knife
  • Styrofoam egg
  • 3/4 inch applique pins
  • Ribbon
  • Hot glue gun and glue sticks
  • Artifical leaves/flower berry pick
  • Thimble (optional)

With paper trimmer, cut scrapbook paper into 1 inch by 2 inch rectangles.  Along one length of each rectangle, fold in opposite corners to form a triangle.  Use the bone folder to make all folds lie flat.


On narrow end of of Styrofoam egg, pin the short points of four triangles to the center (seam side facing inward), forming a square.  Pin each remaining long point of the four triangles smoothly against the egg.  Stagger remaining rows.  Put triangles side by side with long points slightly overlapping.  Pin only the long points to the egg.  Leave short points anging free.  Short points of the triangles should align with the joining seams of the previous row.  Continue pinning rows until about 1-inch square of egg shows at the top.


 Fold over ribbon to form a hanging loop.  Pin ribbon ends to center of open area on top of egg.  Secure with hot glue.  Using a needle nose plier/wire cutter, make a hole in egg to insert your pick (shorten the pick to a half inch or so.)  With glue gun, add your pick to the hole you just created.  Hang on your Christmas tree!


 I made six of these cute pinecone ornaments - one for myself and the others as gifts for family and a friend.  {I had already mailed the one to my friend which is why there are only five in the photographs.}  Of course, deciding which one I wanted to keep for myself was hard, but this one is going on my tree.


There are so many fun papers to pick from.  I even got a little fancy and made one with stripes.  It was a little tricking getting the folding just right and the pinning straight.  {Never mind figuring out how to cut the paper the right way!}  I think it turned out pretty great even with that added degree of difficulty.


 I can't wait to give these as gifts!

I'll be sharing this tutorial at these parties.

Saturday, November 10, 2012

{Handmade Christmas} Ornament Wreath

I was in Macy's the other day and they were playing Christmas music.  I LOVE Christmas music but I think it shouldn't be played until the day after Thanksgiving.  {Okay, maybe Thanksgiving night is fine.}

Now, if you are like me and love making things for Christmas - decorations, cookies, presents, etc. - it is best to get started early.  And that is what I did last weekend.  Using ornaments I purchased on sale after Christmas a couple of years ago, I made this beautiful and easy ornament wreath.


Here's how you can make one too:

Materials
floral foam wreath form
roll of wide ribbon
strong craft wire
hot glue gun and lots of glue sticks
ornaments in various sizes


Instructions
Cover wreath form with ribbon.  Every few wraps secure ribbon in place with hot glue.  Wrap wire around wreath and twist into a loop for hanging.


Hot glue the largest ornaments around the outside edge of wreath.  Be sure to work on a flat surface in order to keep the ornaments flat so the wreath will sit flush against the wall when hung.


Hot glue the medium sized ornaments onto the top of wreath.


Lastly, fill in the wreath with the smallest ornaments.


Hang your ornament wreath and enjoy!


My wreath is available for sale in my Etsy shop along with other Christmas items.  Be sure to check them out.

I am sharing this tutorial at these great parties.

Saturday, September 8, 2012

Outdoor Pillows

As the summer winds down, I have one last project for my patio.  


One day driving around somewhere {I think it was Independence, IA} I saw someone had a pillow on their andirondack chair.  I thought that looked really cool and wanted one.  

I had some pillows in my guest room that I didn't want anymore so I could use them for this project.  I originally was going to do one pillow but I couldn't decide which fabric I liked better so I decided to make two.


I made these envelope style {I feel like there is a different name for these but for the life of me I cannot think of it.  So I'm calling them envelope style.}  There are plenty of instructions on the internet to help you make these but I went from my memory.  This style pillow case was one of my first 4-H projects {a long time ago.}


Here's how I did it for my 17" pillows:

From a 1/2 yard of fabric {I used outdoor canvas} cut the following:
  • 18" x 18" (piece A)
  • 13" x 18"  (piece B)
  • 11 1/4 x 18" (piece C)
Piece B - On one long edge fold under 1/4".  Press.  Fold under another 1/4".  Press.  Sew close to edge.

Piece C - On one long edge fold under 1/4".  Press.  Fold under another 1".  Press.  Sew close to edge.

With right sides together, match raw edges of piece A and piece C.  Pin.

On the opposite end, with right sides together, match raw edges of piece A and piece B.  Pin.  

Sew together with a 1/2" seam.  Clip corners.  Turn inside out.  

Insert pillow form and enjoy your new pillow!  {Please let me know if something doesn't make sense in these instructions.  I'm not the best at explaining things.  Just ask the new employee I'm training at work.}


Take a look at these other projects I made for my patio:
Wooden Floor Mat
Painted Tiered Planter


I will be sharing this tutorial at these great parties.

Saturday, July 28, 2012

iPhone Case Insert

{Pinterest Challenge}
Here's a quick project I did one evening recently.  It's my twist on the popular DIY cell phone case insert.  My twist - instead of scrapbook paper, I used one of my own original photographs.


Here's what I did:


1.  Bought a clear iPhone case at Target.


2.  Printed a photograph.  My photo was landscape so I made a 5"x7" print.  If yours is portrait, it can be a 4"x6" print.


3.  Measured inside of phone case.  Mine was 2 1/4"x4 7/16".

4.  Cut photo to size.  I used my paper cutter for a straight cut.  Scissors would work just as good.

5.  Rounded the corners with a scissors.

6.  Cut out hole for camera.  I wish I had a good tip for this step but I don't.  I used a paper punch, small scissor, and an exacto knife trying to get the perfect shape.  It's a little rough but the black edging covers it nicely.

7.  Inserted cut photo into case.


This would be a great way to showcase a photo of your kids or pet.  {I have neither so I picked a pretty flower.}


I am sharing this tutorial at these parties.

Saturday, June 2, 2012

T-Shirt Shrug

{Pinterest Challenge}
Have you ever made a project that just didn't come out as great as you thought it would?  That is how I feel about this project.  When I saw this t-shirt shrug by Cut Out + Keep on Pinterest, I was really excited and was waiting for the right time to make one.


My brother is getting married this weekend.  I found a great maxi sundress at Marshall's {for a great price - $29.99!} to wear to the wedding.  But I'm always cold and it will be an outdoor evening ceremony so I needed some type of cover-up.  This was the perfect time to make the t-shirt shrug!  I crossed my fingers as I searched my old t-shirts and luckily found a blue one that would match the dress.  I even documented the quick and easy steps for you to follow along.  {The directions by Cut Out + Keep are awesome so this is just a little supplement for you.}


1. Grab a shirt.  {This is an old shirt from Northern Reflections.  Does anyone remember that store?  I loved that store.}


2.  Cut down the front of the shirt.  {I measured the center from side seam to side seam and drew a straight line to cut.}


3.  Cut off the neck band.


4.  Turn shirt inside out and fold 1 inch along the cut edge to form the casing.   Pin.  I cut a v into the front to help with this step.  {I just wasn't feeling it before I did this.}  I would also recommend doing this step with an iron handy to press the fold.  {I did not do this but wish I had.}  I think it would be especially helpful on the neck curve.


5.  Sew.  I had two puckers around the neck that I had to rip out.  That is why I made the suggestion to iron as you do step 4.  I ironed when I was fixing my problems and it seemed to help a lot.  {Sorry, I forgot to take a picture of this step.}


6.  Using a safety pin, pull the ribbon throughout the casing.  {I had to do this step three times because sometimes I'm an idiot.  The ribbon frayed the first time and the pin came off as I was pulling it through at about the 3/4 point.  Then when I was putting it on, I wasn't paying attention and I pulled the ribbon too much on one side.}  I used a 5/8 satin ribbon.  I don't know how much I used because I just pulled it straight off the spool and cut it off when I had it pulled through to a nice length.


7.  Pull tight and tie.  And you have made a t-shirt shrug.


So, you are probably wondering what I don't like about the shrug.  Overall I like it and it looks really cute with jeans and a tank.  But I had high hopes to wear it with my sundress to the wedding and it just doesn't work with the dress.  I think the biggest problem with it is that the t-shirt is too heavy and structured and too long.  {The shoulders are funny and it is too long in the back which also makes the sides have kind of a funny bunch to them.}  I was thinking of something more light and short.  I didn't buy anything to make this shrug so I'm not feeling too bad about it not being as great as I thought it would be.


P.S.  I tried and tried {and tried} to get a picture of the shrug being worn but I just couldn't get one to turn out.


I am sharing at these great parties.